Access configuration Example
Basic strcture.
Part 1. The organization!
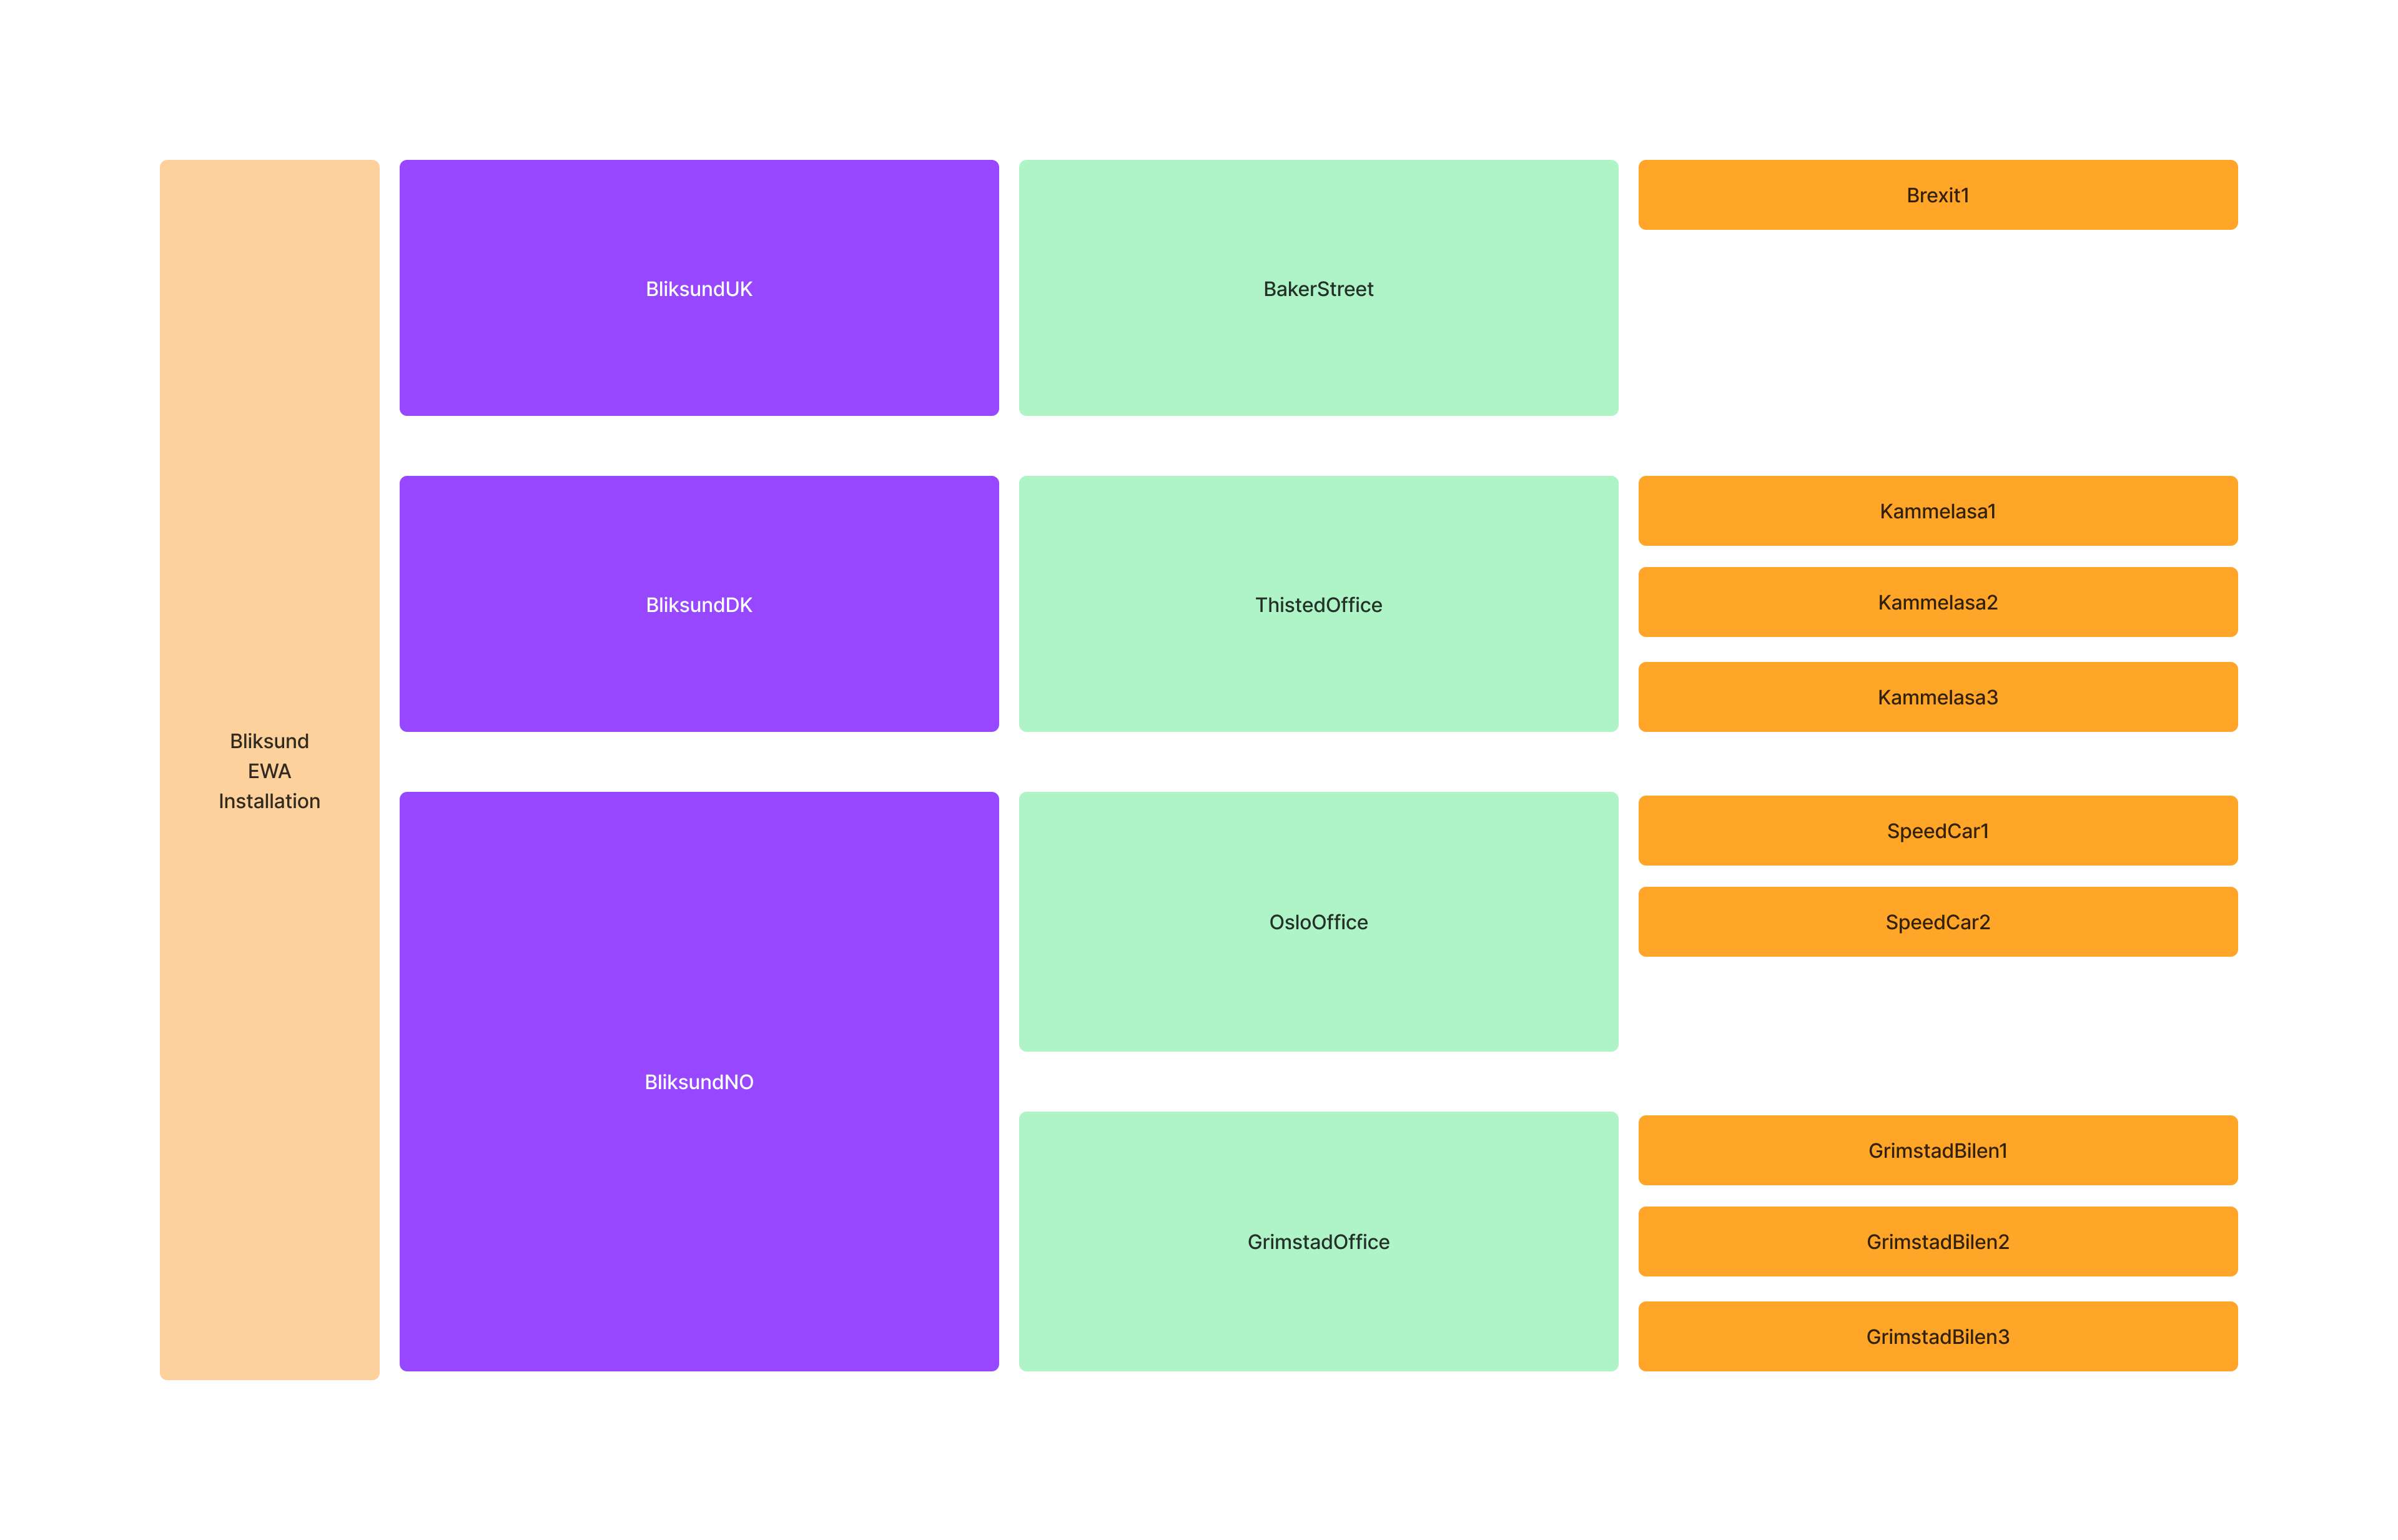
Let’s create a scenario where Bliksund has a EWA system installation. In this scenario we have 3 organizations (Health Trusts), 4 departments (Stations) and 9 total resources (Ambulances). It’s divided as follows:
- Bliksund Installation
- BliksundNO (Health Trusts)
- Oslo Office (Station)
- Speed Car 1 (Resource)
- Speed Car 2 (Resource)
- Grimstad Office (Station)
- Grimstad Car 1 (Resource)
- Grimstad Car 2 (Resource)
- Grimstad Car 3 (Resource)
- Oslo Office (Station)
- BliksundDK (Health Trusts)
- Thisted Office (Station)
- Kammelasa 1 (Resource)
- Kammelasa 2 (Resource)
- Kammelasa 3 (Resource)
- Thisted Office (Station)
- BliksundUK (Health Trusts)
- Baker Street (Station)
- Brexit 1 (Resource)
- Baker Street (Station)
- BliksundNO (Health Trusts)
Note!
You would configure this structure using Insight, see (DOC TBA)
We now have an organizational structure that looks like this:

Part 2. The Users!
In this fictional system we have 4 users: Ola Normann, Kari Nordmann, Herr Sørensen og John Doe. For the sake of the example, let’s define a simplified employment relationship for them.
- Ola Normann works as a standard ambulance worker in the Grimstad Office.
He needs access to do the following:- create journals in the EWA client.
- View and edit his journals in insight.
- Kari Normann works as an ambulance worker in the Oslo Office, but shes also an administrator for BliksundNO.
She needs access to do the following:- create journals in the EWA client.
- View and edit all BliksundNO journals in insight.
- Herr Sørensen works as an ambulance worker in the Thisted Office, he also has some responsibilities to create reports for that Station.
He needs access to do the following:- create journals in the EWA client.
- View and edit his journals in insight.
- View Thisted Office journals in insight.
- View reports for Thisted Office journals in insight.
- John Doe works as an administrator for the EWA/Bliksund system.
He needs access to do the following:- Global admin rights in the EWA system
NOTE!
You can always find the name and description for the specific access rights, in the access right section: Access Rights.
Part 3. The problem!
We'll soon get in to how we actually configure the system, but as a starting point it's a good idea to understand one of the many problems we're trying to solve with configuring access right this way.
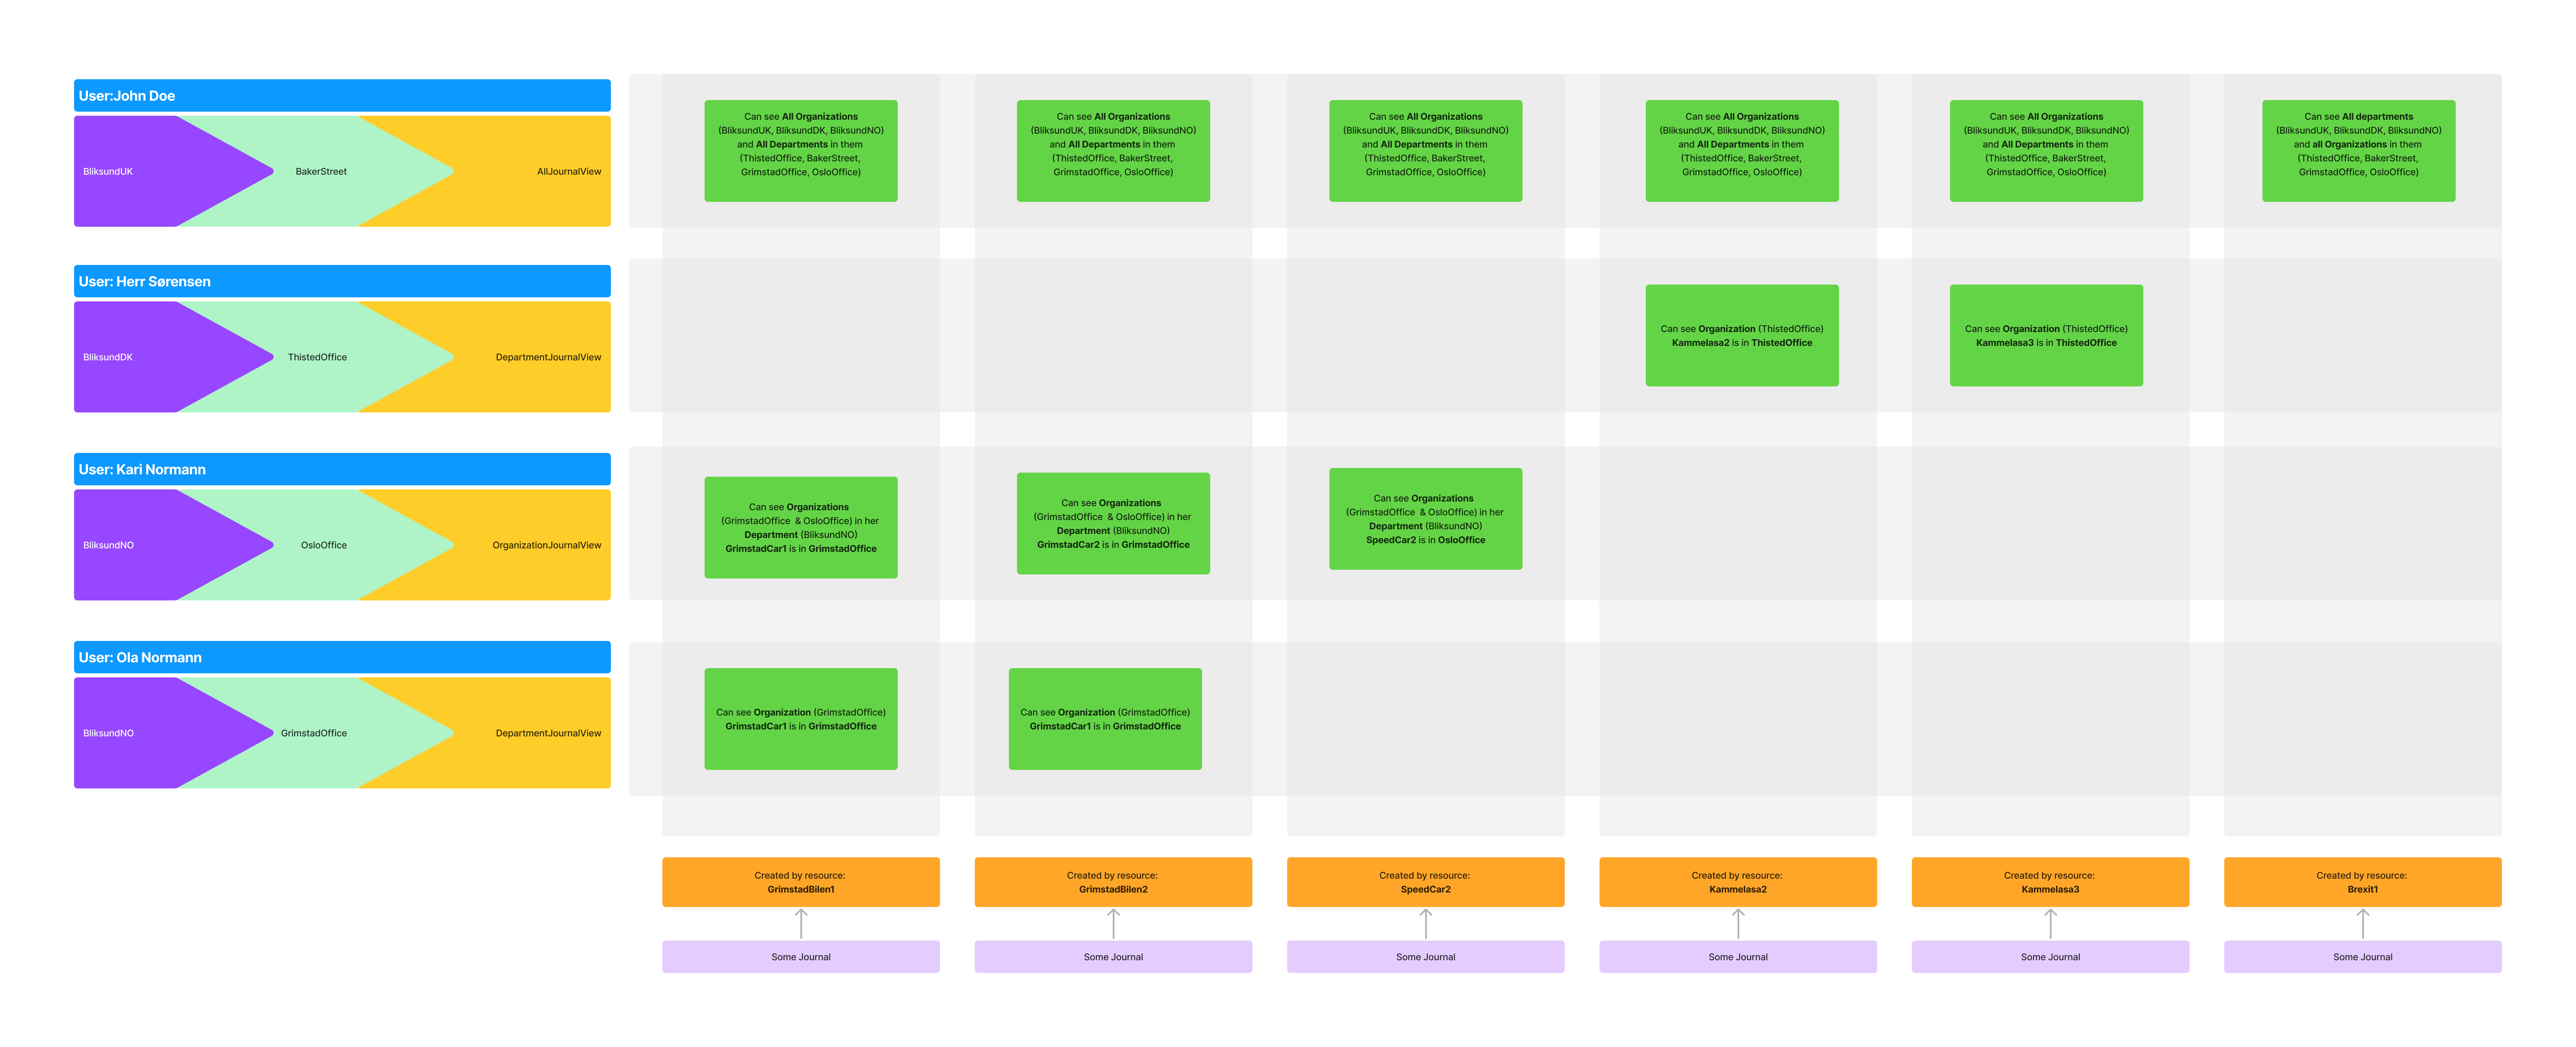
To start, let's say we have 6 journals, created by 6 different resources. When a user tires to view journals, we need to make sure they can only see the journals they have access too.
-
John Doe should be able to see all journals, because he is a global admin. (using the access right AllJournalsView)
-
Herr Sørensen should only be able to see the journals of resources that are part of the ThistedOffice. (using the access right DepartmentJournalView)
-
Kari Normann should only be able to see the journals of resources that are part of all departments in the BliksundNO organization. (using the access right OrganizationJournalView)
-
Ola Normann should only be able to see the journals of resources that are part of the GrimstadOffice. (using the access right DepartmentJournalView)
The resulting access matrix will look like this:

This migh still be a little hard to understand fully and we're going to circe back to this later on, so don't worry if you don't fully get it yet.
Key take away's:
The 'true' access right of a user is a combination of Organization, Department AND the given access rights.
eg. Herr Sørensen and Ola Normann both have the access right DepartmentJournalView, but they both have access to a different set of journals because they are in different departments (and organizations in this case.)
Let's get authorizing.
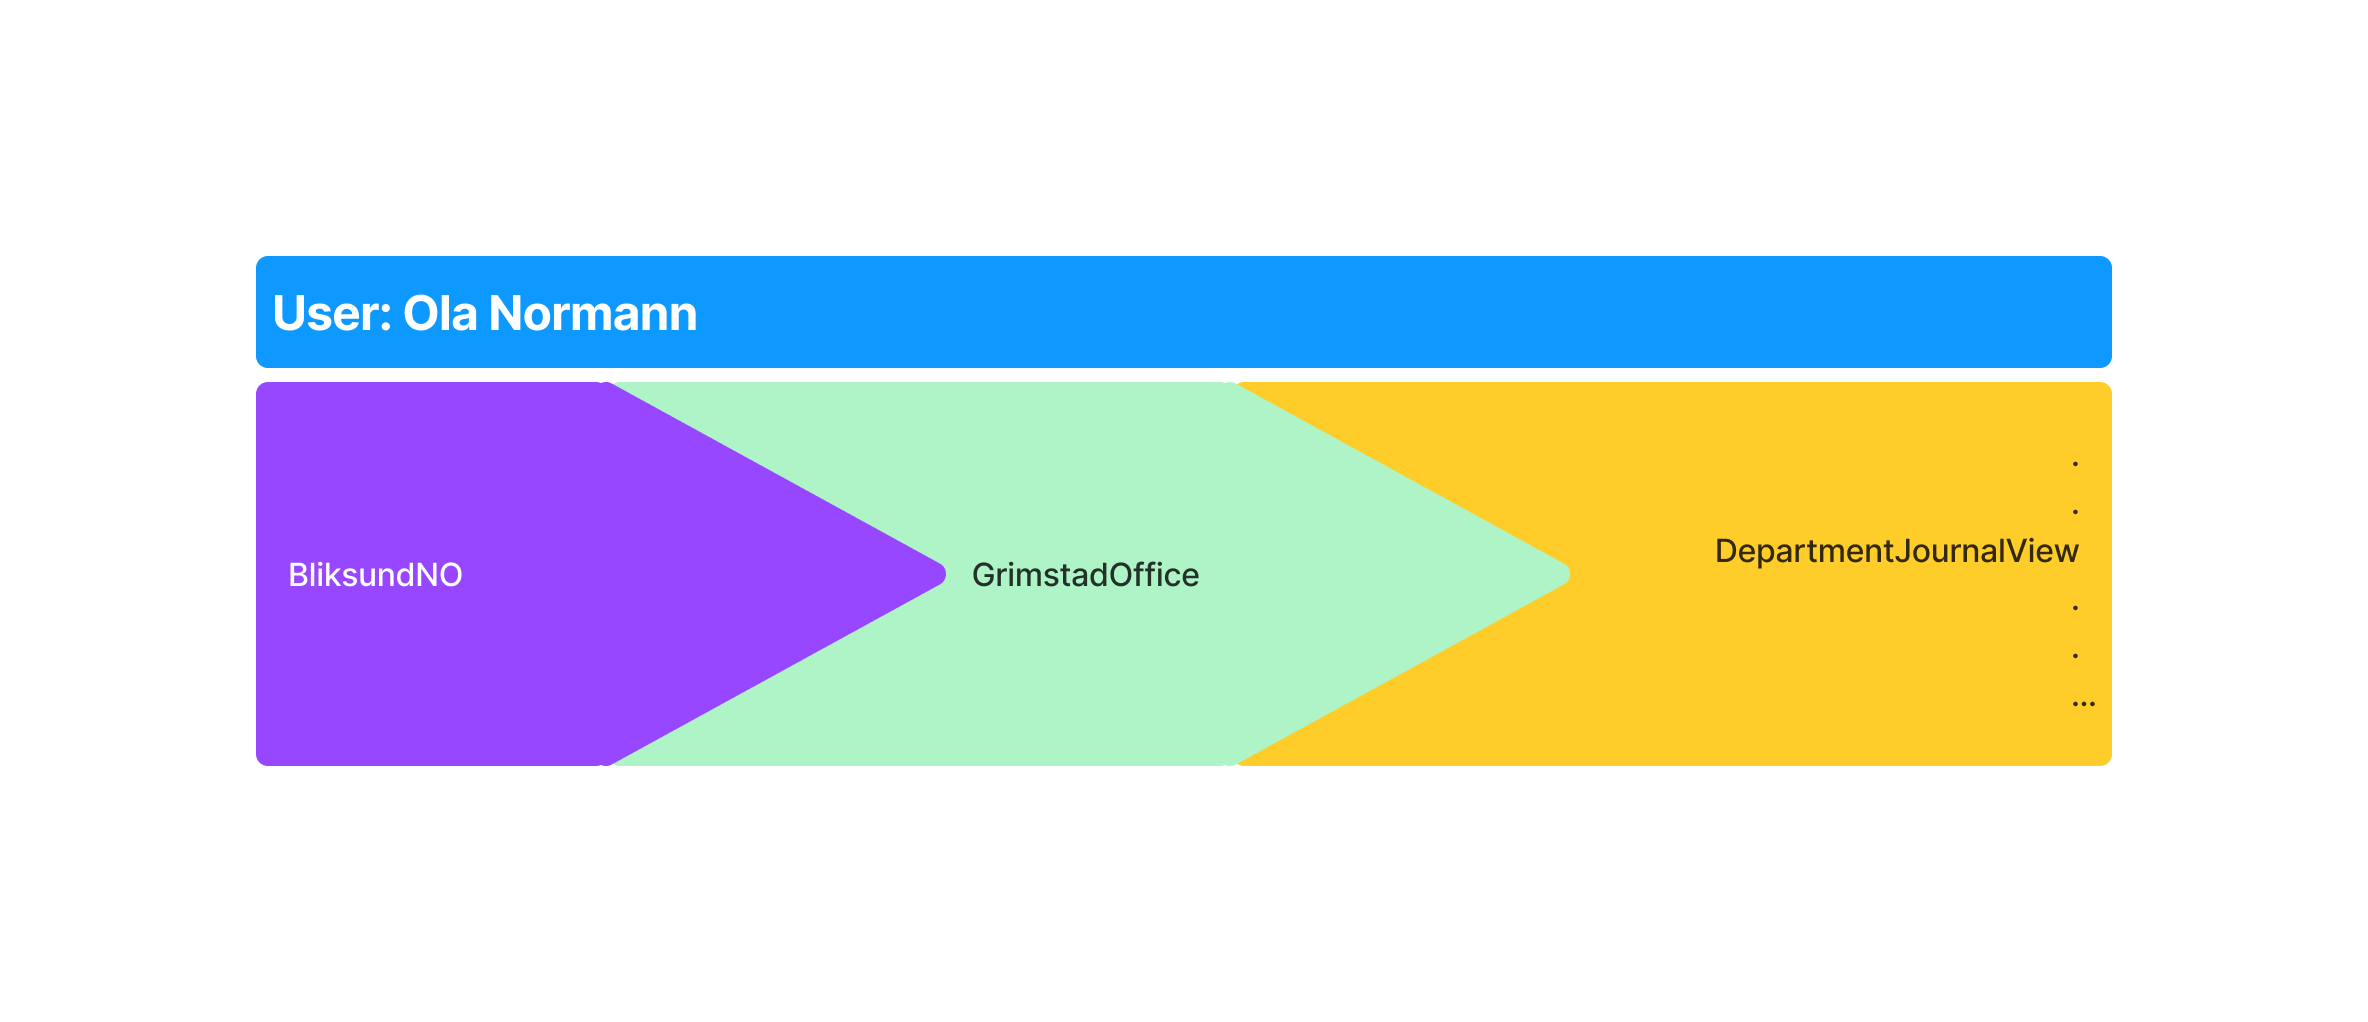
Continuing from the example above, what the EWA system was to do is create a user object that looks something like this:

This is Ola Normann, he's in Organization BliksundNO, department GrimstadOffice and he has this list of Access Rights.
To build this object EWA supports a few approaches, all based on OIDC. (see EWA OIDC.)
Which approach that works for you depends of what capabilities your OIDC provider has.
Approach 1. Auto Mapping.
Prerequisites:
We recommend using this approach if the token provided by your OIDC provider can include a value for
- "organizations"
- "departments"
- "roles"
In addition, each value must have claims of the same length. Using our example organization, the token for Ola Normann would look like this:
NOTE!
We're also assuming that Ola Norman can login in Olso and Denmark here.
This is just to illustrate how different departments and organizations would be built.
organizations: {
	"BliksundNO"		//(org.1)
	"BliksundNO"		//(org.2)
	"BliksundNO"		//(org.3)
	"BliksundDK"		//(org.3)
}

departments: {
	"GrimstadOffice"		//(dep.1)
	"GrimstadOffice"		//(dep.2)
	"OlsoOffice"			//(dep.3)
	"ThistedOffice"			//(dep.4)
}

roles: {
	"PEPJ_AmbulanceWorker"		//(rol.1)
	"PEPJ_Reporting"			//(rol.2)
	"PEPJ_AmbulanceWorker"		//(rol.3)
	"PEPJ_JournalEditor"		//(rol.3)
}
Again note that we have 4 values in each claim, this is important because in the Auto Mapping setup we use the index to parse these.
IE. org.1 => dep.1 => rol.1
so the claims here would be transformed as such:
// First we just map them one to one.
step 1. Index Map:
	"BliksundNO" => "GrimstadOffice" => "PEPJ_AmbulanceWorker"
	"BliksundNO" => "GrimstadOffice" => "PEPJ_Reporting"
	"BliksundNO" => "OsloOffice" 	 => "PEPJ_AmbulanceWorker"
	"BliksundDK" => "ThistedOffice"  => "PEPJ_JournalEditor"

// Then we merge duplicates, so that we get a tree like structure.
step 2. Merge:
	"BliksundNO" ──> "GrimstadOffice" ──> "PEPJ_AmbulanceWorker"
				 |					  └─> "PEPJ_Reporting"
				 |
				 └─> "OsloOffice" ──────> "PEPJ_AmbulanceWorker"

	"BliksundDK" ──> "ThistedOffice" ───> "PEPJ_JournalEditor"
The Final thing the system now has to do is replace the 'roles' with the actual access rights for that role.
This is were we use the so aptly named RoleToAccessMapping.json file.
Given that the file looks like this:
RoleToAccessMapping.json
[
  {
    "Role": "PEPJ_AmbulanceWorker",
    "DisplayName": "Paramedic",
    "AccessRights": [
      "Client",
	  "UserJournalView",
	  "UserJournalEdit"
    ]
  },
  {
    "Role": "PEPJ_JournalEditor",
	"DisplayName": "Overview Admin",
    "AccessRights": [
      "AllJournalView",
	  "OrganizationAuditLog"
    ]
  },
  {
    "Role": "PEPJ_Reporting",
	"DisplayName": "Reporting",
    "AccessRights": [
      "OrganizationReportOverview",
	  "OrganizationJournalView"
    ]
  }
]
The final tree after replacement looks like this:
										  // get the PEPJ_AmbulanceWorker claims
	"BliksundNO" ──> "GrimstadOffice" ──> "Client"
				 |					  └─> "UserJournalView"
				 |					  └─> "UserJournalEdit"
				 |					  |
				 |					  |	  // get the PEPJ_Reporting claims
				 |					  └─> "OrganizationReportOverview"
				 |					  └─> "OrganizationJournalView"
				 |
				 |					   	  // get the PEPJ_AmbulanceWorker claims
				 └─> "OsloOffice" ──────> "PEPJ_AmbulanceWorker"
				 					  └─> "UserJournalView"
									  └─> "UserJournalEdit"

				 						  // get the PEPJ_JournalEditor claims
	"BliksundDK" ──> "ThistedOffice"  ──> "AllJournalView"
				 					  └─> "OrganizationAuditLog"
From this we can see that this user has access to his own journals created on resources belonging to GrimstadOffice and OsloOffice. He can see all journals created in ThistedOffice, and he can see reports for journals concerning the GrimstadOffice.
Approach 2. Manual mapping using Role Picker.
If the identity provider can't create a structured token like in approach 1, we need to configure the system for manual mapping. In this setup we have a token that looks something like this:
departments: {
	"GrimstadOffice"
	"OlsoOffice"
	"ThistedOffice"
}

roles: {
	"PEPJ_AmbulanceWorker"
	"PEPJ_Reporting"
	"PEPJ_AmbulanceWorker"
	"PEPJ_JournalEditor"
}
The main difference we see here is that first, we don't have a list of organizations anymore, we also have an arbitrary length in each claim.
To start with the EWA system need to map departments in to organizations, this is done with the DepartmentIdMapping.json.
For our example organization it looks like this:
DepartmentIdMapping.json
[
  {
    "DepartmentId": "GrimstadOffice", // matches a department we could find in the token
    "DepartmentName": "Grimstad (Bliksund NO)", // just a display name used later..
    "OrganizationId": "4444_3333_2111" // matches an id given to a organization (health trust) created in Insight.
  },
  {
    "DepartmentId": "OsloOffice", // matches a department we could find in the token
    "DepartmentName": "Oslo (Bliksund NO)", // just a display name used later..
    "OrganizationId": "4444_3333_2111" // matches an id given to a organization (health trust) created in Insight.
  },
  {
    "DepartmentId": "ThistedOffice", // matches a department we could find in the token
    "DepartmentName": "Thisted (Bliksund DK)", // just a display name used later..
    "OrganizationId": "2222_2222_4444" // matches an id given to a organization (health trust) created in Insight.
  },
  {
    "DepartmentId": "BakerStreet", // matches a department we could find in the token
    "DepartmentName": "Baker (Bliksund UK)", // just a display name used later..
    "OrganizationId": "1111_2222_3333" // matches an id given to a organization (health trust) created in Insight.
  }
]
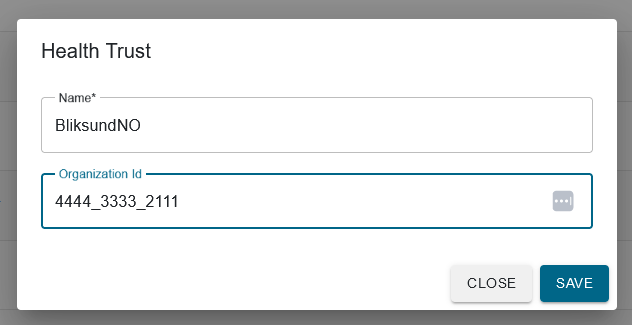
here we can see that GrimstadOffice and OsloOffice use the same Organization id, and in Insight we've made the BliksundNO organization like so:

We also made one for BliksundDK and BliksundUK with their respective Id's 2222_2222_4444 and 1111_2222_3333. EWA can now start the first steps of the mapping. (in memory) it will now look like this:
// using DepartmentIdMapping and checking insight we get:
1. map from DepartmentIdMapping / Insight
"GrimstadOffice" => "4444_3333_2111" => "BliksundNO"
"OlsoOffice" 	 => "4444_3333_2111" => "BliksundNO"
"ThistedOffice"  => "2222_2222_4444" => "BliksundDK"


// Then we reverse the relationship and do some cleanup.
step 2. Reverse and Merge:
	"BliksundNO" ──> "GrimstadOffice" ──> "?"
				 |
				 └─> "OsloOffice" ──────> "?"

	"BliksundDK" ──> "ThistedOffice" ───> "?"
Now we almost have the same structure as approach 1. but we don't know what roles belong to what organization / department.
This is where the role picker comes in to play.
Given a RoleToAccessMapping.json file that looks like this Given that the file looks like this:
RoleToAccessMapping.json
[
  {
    "Role": "PEPJ_AmbulanceWorker",
    "DisplayName": "Paramedic",
    "AccessRights": [
      "Client",
	  "UserJournalView",
	  "UserJournalEdit"
    ]
  },
  {
    "Role": "PEPJ_JournalEditor",
	"DisplayName": "Overview Admin",
    "AccessRights": [
      "AllJournalView",
	  "OrganizationAuditLog"
    ]
  },
  {
    "Role": "PEPJ_Reporting",
	"DisplayName": "Reporting",
    "AccessRights": [
      "OrganizationReportOverview",
	  "OrganizationJournalView"
    ]
  }
]
When we login to insight we'll be greeted with the role picker screen:

Here we can first select witch department / organization combo we are logging inn as today.
IE. Ola Normann is a Paramedic in Grimstad today.

Note that what is displayed in the role picker is the DisplayName property in RoleToAccessMapping, and the DepartmentName in DepartmentIdMapping
selecting this configuration, my token will look like this:
										  // get the PEPJ_AmbulanceWorker claims
	"BliksundNO" ──> "GrimstadOffice" ──> "Client"
				 					  └─> "UserJournalView"
				 					  └─> "UserJournalEdit"
IE. we remove the departments / organizations we didn't select, and we fill out the access right with the role we selected.
In this case Ola Normann will only be able to use the EWA client in GrimstadOffice resources, and can only see / edit his own journals in those resources.